Drywall Sander Manual: A Comprehensive Guide
This manual provides detailed instructions for operating and maintaining drywall sanders. It covers safety‚ assembly‚ usage‚ troubleshooting‚ and component details‚
ensuring efficient drywall finishing.
Drywall sanders are power tools specifically designed to smooth and refine drywall surfaces after application and joint compound work. Unlike traditional hand sanding‚ these tools significantly reduce dust‚ save time‚ and deliver a more consistent finish. They are indispensable for professional contractors and increasingly popular among DIY enthusiasts tackling home renovation projects.
The evolution of drywall sanding has moved from laborious manual methods to sophisticated power tools. Early sanders were often cumbersome and inefficient‚ producing substantial dust. Modern drywall sanders incorporate features like variable speed control‚ vacuum attachments‚ and ergonomic designs to enhance user comfort and improve sanding quality. Understanding the different types and components of these sanders is crucial for selecting the right tool for your needs;
This guide will provide a comprehensive overview of drywall sanders‚ covering everything from safety precautions and assembly to advanced sanding techniques and maintenance procedures. Whether you’re a seasoned professional or a first-time user‚ this manual will equip you with the knowledge to achieve professional-quality results.
Types of Drywall Sanders
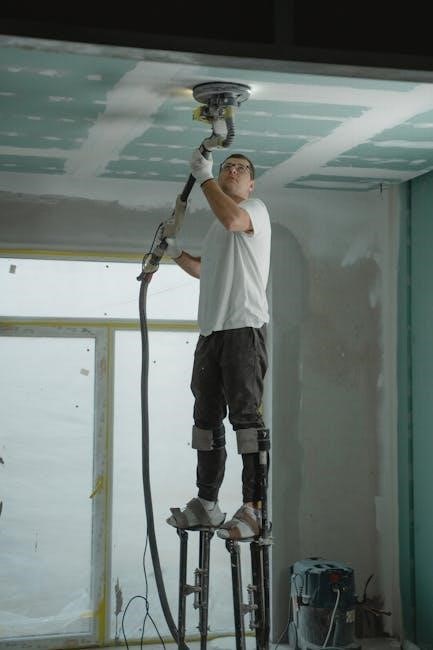
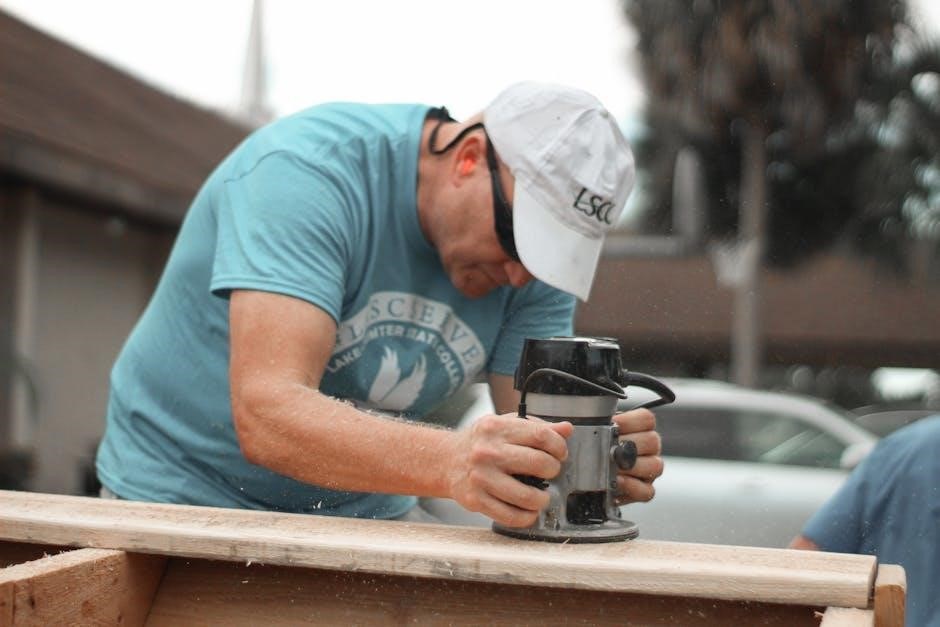
Drywall sanders primarily fall into several categories‚ each suited for different tasks and project scales. Pole sanders‚ featuring a long handle‚ are ideal for sanding ceilings and high walls‚ minimizing strain and maximizing reach. They typically utilize a rotating sanding head and require a vacuum attachment for dust control;
Giraffe sanders‚ also known as long-reach sanders‚ offer even greater reach and often incorporate features like automatic dust extraction and variable speed settings. These are favored by professionals for large-scale projects. Handheld sanders‚ resembling orbital sanders‚ are best for smaller repairs‚ detail work‚ and tight spaces‚ offering greater maneuverability.
Sanding sponges and blocks‚ while not powered‚ are essential for hand sanding corners and edges. Finally‚ vacuum sanders integrate the sanding and dust collection systems into a single unit‚ providing a cleaner and more efficient sanding experience. Choosing the appropriate type depends on the project size‚ ceiling height‚ and desired level of dust control.
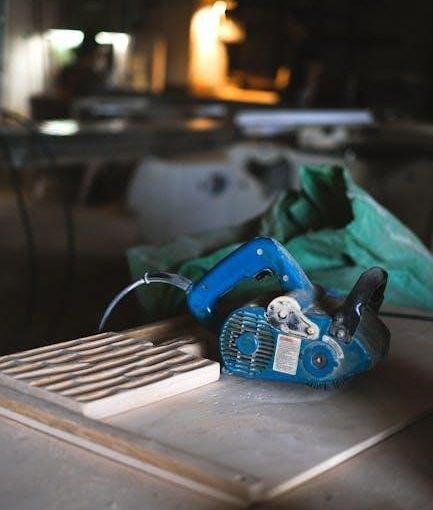
Components of a Drywall Sander
A drywall sander comprises several key components working in unison. The motor provides the power for the sanding head’s rotation‚ with variable speed options controlling the sanding intensity. The sanding head‚ typically circular‚ holds the sandpaper and distributes the abrasive force.
The sanding pad‚ often a hook-and-loop surface‚ securely attaches the sandpaper to the head. A crucial element is the dust extraction port‚ connecting to a vacuum to capture airborne particles. Extension poles‚ used with pole sanders‚ extend the reach for ceilings and high walls;
Many models feature an adjustable handle for ergonomic comfort and control. The power cord supplies electricity‚ while some newer models offer cordless operation with rechargeable batteries. Finally‚ a speed control dial allows users to customize the sanding speed based on the drywall’s condition and the sandpaper grit. Understanding these components aids in proper assembly‚ operation‚ and maintenance.
Safety Precautions When Using a Drywall Sander
Prioritize safety when operating a drywall sander. Always wear safety glasses or a face shield to protect your eyes from dust and debris. A dust mask or respirator is essential to prevent inhalation of harmful drywall particles‚ safeguarding your respiratory system.

Hearing protection‚ such as earplugs or earmuffs‚ is recommended due to the sander’s noise level. Wear appropriate clothing – avoid loose garments that could get caught in the machine. Ensure the work area is well-ventilated to minimize dust concentration.
Before use‚ inspect the power cord for damage and never operate a sander with a frayed cord. Keep bystanders away from the work area. Disconnect the sander from the power source before making adjustments or changing sandpaper. Avoid using the sander in damp or wet conditions to prevent electrical shock. Always follow the manufacturer’s instructions for safe operation.
Assembling Your Drywall Sander
Begin assembly by carefully unpacking all components and verifying against the parts list. Typically‚ this includes the sanding head‚ extension pole (if applicable)‚ vacuum adapter‚ and handle. Attach the extension pole to the sanding head‚ ensuring a secure connection – often a twist-lock mechanism is used.
Secure the handle to the extension pole or directly to the sanding head‚ tightening any knobs or screws provided. Connect the vacuum adapter to the designated port on the sanding head; this is crucial for dust control. Ensure all connections are firm and stable before proceeding.
Inspect the sanding pad and confirm it’s properly mounted onto the sanding head. Some models require a specific orientation. Double-check all fasteners – screws‚ knobs‚ and locks – to prevent loosening during operation. Refer to the detailed diagrams in your sander’s manual for visual guidance throughout the assembly process. A properly assembled sander is vital for safe and efficient operation.
Loading Sandpaper onto the Sander
Begin by ensuring the sander is switched off and disconnected from the power source for safety. Most drywall sanders utilize a hook-and-loop (Velcro) system for attaching sandpaper. Select the appropriate grit sandpaper for your task – coarser grits for initial sanding‚ finer grits for finishing.
Carefully align the sandpaper disc with the sanding pad‚ ensuring it’s centered. Press firmly to secure the sandpaper to the hook-and-loop surface. Verify the sandpaper is fully adhered and lies flat‚ without any wrinkles or bubbles. An improperly attached sandpaper disc can lead to uneven sanding or even detachment during use.
Inspect the edges of the sandpaper to confirm they are securely fastened. Some sanders may have clips or retainers to further secure the disc. Discard damaged or worn sandpaper immediately. Always use fresh sandpaper for optimal results and to prevent damage to the drywall surface.
Adjusting Sander Speed and Settings
Drywall sanders often feature variable speed control‚ allowing you to tailor the sanding intensity to the task at hand. Lower speeds are ideal for initial sanding or delicate surfaces‚ minimizing dust and preventing gouging. Higher speeds are suitable for faster material removal and smoothing larger areas.
Locate the speed control dial or button on your sander – it’s typically clearly marked. Start with a lower speed setting and gradually increase it as needed‚ observing the sanding action. Avoid excessive speed‚ which can overheat the motor and damage the drywall. Some models include preset speed settings for specific applications.
Consider the sandpaper grit when adjusting speed; coarser grits generally require lower speeds. Pay attention to the dust extraction system – higher speeds generate more dust‚ so ensure adequate vacuum attachment. Regularly check the speed setting during use and adjust as necessary to maintain optimal performance and a smooth finish.
Vacuum Attachment and Dust Control
Effective dust control is crucial when using a drywall sander‚ protecting your lungs and maintaining a clean workspace. Most sanders are designed to connect to a shop vacuum‚ capturing dust at the source. Locate the dust port on the sander and securely attach the vacuum hose using the provided adapter.
Ensure a tight seal between the hose and the port to maximize suction. Regularly check the vacuum filter and empty the dust collection bag or canister to maintain optimal performance. Some sanders feature built-in dust collection systems‚ but a shop vacuum provides superior dust removal.
Consider using a HEPA filter in your vacuum for finer dust particle capture. Work in a well-ventilated area even with a vacuum attached. Wear a dust mask or respirator for added protection. Proper dust control minimizes cleanup and creates a healthier working environment‚ contributing to a professional finish.
Starting and Stopping the Sander
Before starting‚ ensure the sandpaper is securely attached and the vacuum is connected‚ if applicable. Inspect the work area for any obstructions. Hold the sander firmly with both hands‚ maintaining a stable grip. Initiate the sander by pressing the power button or trigger switch.
Begin sanding with a gentle‚ sweeping motion‚ avoiding excessive pressure. Allow the sander to do the work; forcing it can cause uneven results or damage the drywall. To stop the sander‚ release the power button or trigger. Do not abruptly halt the sander against the wall; lift it slightly before switching it off.
Always allow the sanding pad to come to a complete stop before setting the sander down. Disconnect the power source when changing sandpaper or performing maintenance. Never leave a running sander unattended. Following these procedures ensures safe and controlled operation.
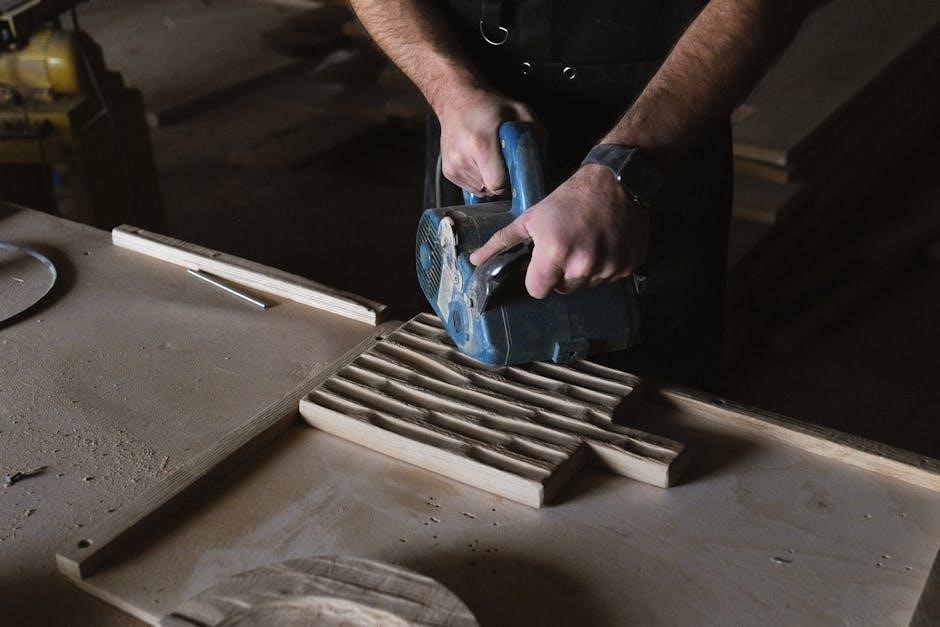
Sanding Techniques for Drywall
Effective drywall sanding requires a consistent approach. Begin with a lighter grit sandpaper (e.g.‚ 120-grit) for initial smoothing‚ then progress to finer grits (e.g.‚ 150-180 grit) for a polished finish. Maintain a low angle (around 15-20 degrees) between the sander and the wall surface.
Use overlapping passes‚ moving in smooth‚ even strokes. Avoid applying excessive pressure‚ letting the sander’s weight and speed do the work. Feather the edges of sanded areas to blend them seamlessly with the surrounding drywall. Inspect frequently for imperfections and adjust technique accordingly.
For larger areas‚ work in sections‚ maintaining a consistent pattern. Pay close attention to screw heads and joint compound‚ ensuring they are flush with the surface. Regularly check the sandpaper for wear and replace it when necessary for optimal results.

Sanding New Drywall
Sanding newly installed drywall differs from repairing patches. Start with a 120-grit sandpaper to knock down raised areas from the taping and mudding process. Focus on achieving a uniform surface‚ removing any ridges or imperfections left by the drywall knife. Employ broad‚ sweeping motions with the sander‚ avoiding concentrated pressure on any single spot.
Dust control is crucial during this phase‚ as new drywall generates significant dust. Ensure a vacuum attachment is securely connected and functioning correctly. Inspect the wall frequently under good lighting to identify areas needing further attention. Transition to a 150-grit sandpaper for a smoother finish‚ preparing the surface for priming.
Avoid sanding too aggressively‚ which can damage the paper facing of the drywall. Maintain a consistent speed and angle to prevent uneven sanding. A light touch is key to achieving a professional-looking result.
Repairing Drywall and Sanding Patches
Sanding drywall patches requires a more delicate approach than sanding new drywall. Begin with 80-120 grit sandpaper to blend the patch compound with the surrounding wall. Feather the edges of the patch to create a seamless transition‚ avoiding a noticeable ridge. Use a sanding block or a detail sander for precise control around the patch edges.
Apply gentle pressure and circular motions to gradually smooth the patch. Frequently check your work with a bright light to ensure the patch is flush with the existing wall. Transition to a finer grit (150-180) as you approach the final sanding stage‚ refining the surface for a smooth finish.
Be cautious not to over-sand‚ which can expose the underlying drywall paper. Dust control is vital‚ as patch compounds often create more dust than new drywall sanding. Vacuum thoroughly after each sanding pass.
Troubleshooting Common Sander Issues
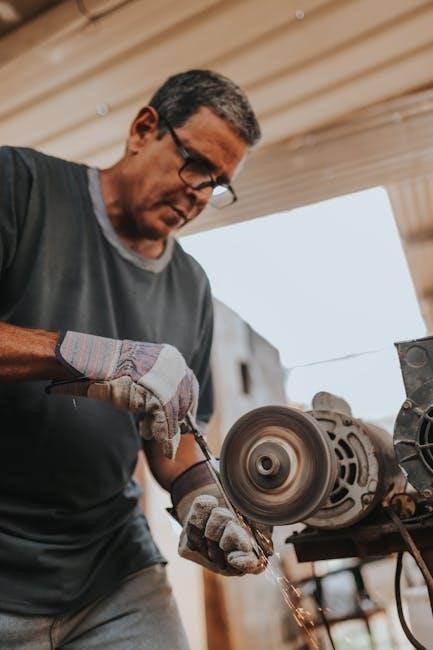
If your drywall sander isn’t starting‚ check the power cord and ensure it’s securely plugged in. Inspect the carbon brushes for wear; worn brushes require replacement. A lack of suction often indicates a clogged vacuum hose or a full dust bag – clear these immediately. Excessive vibration can stem from a loose sanding pad or unbalanced sandpaper; tighten or replace as needed.
Sander speed fluctuations might point to a faulty speed control switch or a failing motor. If the sander stops mid-use‚ it could be overheating; allow it to cool down before resuming. Uneven sanding patterns often result from worn sandpaper or inconsistent pressure.
Always disconnect the power before attempting any repairs. Consult the manufacturer’s documentation for specific troubleshooting steps related to your model. If issues persist‚ professional repair may be necessary;
Maintaining Your Drywall Sander
Regular maintenance extends the life and performance of your drywall sander. After each use‚ thoroughly clean the sander‚ removing accumulated drywall dust from all components – the sanding pad‚ vacuum attachment points‚ and motor housing. Inspect the sanding pad for wear and tear; replace it when it becomes uneven or damaged.
Periodically check the carbon brushes (if applicable) and replace them when they become worn‚ typically every few months with heavy use. Lubricate moving parts‚ such as bearings‚ according to the manufacturer’s recommendations. Ensure the vacuum attachment is secure and free of obstructions.
Store the sander in a dry‚ clean environment. Avoid exposing it to moisture or extreme temperatures. Regularly inspect the power cord for damage and replace it if necessary. Proper maintenance ensures optimal sanding results and prevents premature failure.
Changing the Sanding Pad
Replacing the sanding pad is crucial for maintaining optimal sanding performance. First‚ disconnect the sander from the power source to ensure safety. Locate the mounting mechanism securing the pad – typically screws‚ clips‚ or a quick-release system. Carefully remove the old pad‚ noting its orientation for correct installation of the new one.
Ensure the mounting surface is clean and free of debris before attaching the new pad. Align the new pad with the mounting points and secure it firmly‚ ensuring it’s properly centered. Tighten screws or engage clips until the pad is securely fastened‚ but avoid over-tightening.
Verify the pad is flat and evenly secured before resuming sanding. A worn or damaged pad will result in uneven sanding and reduced efficiency. Regular pad replacement contributes to a smoother‚ more professional finish.
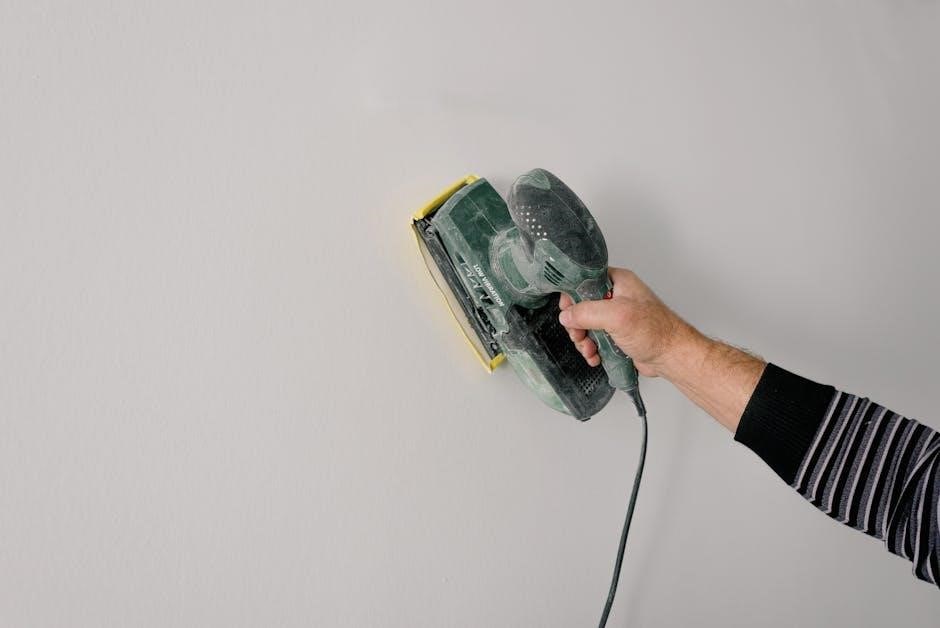
Cleaning the Sander After Use

Regular cleaning extends the life of your drywall sander and maintains its performance. Always disconnect the sander from the power source before cleaning. Remove the dust collection bag or connect it to a vacuum for thorough dust removal from the interior.
Wipe down the exterior of the sander with a damp cloth to remove accumulated dust and debris. Pay attention to ventilation openings‚ ensuring they are clear for proper airflow. Inspect the sanding pad for embedded dust and remove it with a brush or vacuum attachment.
Avoid using harsh chemicals or solvents‚ as they can damage the sander’s components. Check the motor brushes for wear and replace them if necessary. Store the sander in a clean‚ dry place to prevent corrosion and ensure it’s ready for the next use.
Replacing Worn-Out Parts
Over time‚ drywall sander components will wear and require replacement to maintain optimal performance. Common parts needing replacement include the sanding pad‚ motor brushes‚ and dust collection bags. Always disconnect the sander from the power source before attempting any repairs.
To replace the sanding pad‚ loosen the retaining mechanism and remove the old pad‚ installing the new one securely. Motor brushes should be inspected regularly and replaced when worn to prevent motor damage. Dust collection bags should be replaced when full or damaged to ensure efficient dust removal.
Refer to your sander’s parts diagram for specific instructions and part numbers. Use only genuine replacement parts to ensure compatibility and maintain the sander’s warranty. If you are uncomfortable performing these replacements‚ consult a qualified service technician.

Understanding Sander Motor Types
Drywall sanders primarily utilize two motor types: brushed and brushless. Brushed motors are more traditional‚ employing carbon brushes to conduct electricity to the armature. They are generally more affordable but require periodic brush replacement due to wear‚ impacting longevity and potentially reducing power over time.
Brushless motors‚ conversely‚ eliminate the need for brushes‚ utilizing electronic commutation. This results in increased efficiency‚ longer lifespan‚ and reduced maintenance. Brushless motors typically offer higher power output and consistent performance‚ though they often come at a higher initial cost.
The motor’s power is measured in amps‚ indicating its current draw. Higher amperage generally translates to greater sanding power. Consider the size of your typical sanding projects when selecting a sander with an appropriate motor type and power rating.
Variable Speed Control Explained
Variable speed control on a drywall sander is a crucial feature‚ allowing you to adjust the sanding disc’s rotation speed (RPM – revolutions per minute). Lower speeds are ideal for initial sanding of new drywall or delicate repairs‚ minimizing gouging and dust creation. This prevents excessive material removal and provides a smoother finish.
Higher speeds are more effective for removing imperfections‚ feathering edges‚ and tackling tougher sanding tasks. However‚ excessive speed can lead to swirl marks and uneven surfaces. The optimal speed depends on the sandpaper grit‚ the drywall condition‚ and your sanding technique.
Many sanders feature a dial or trigger to control speed. Experimenting with different settings is key to finding the sweet spot for each application. Always start with a lower speed and gradually increase it until you achieve the desired results‚ ensuring control and a professional finish.
Choosing the Right Sandpaper Grit
Selecting the correct sandpaper grit is fundamental to achieving a flawless drywall finish. Lower grit numbers (e.g.‚ 60-80) are aggressive and used for initial sanding‚ removing joint compound imperfections‚ and leveling uneven surfaces. However‚ they leave noticeable scratches.
Medium grits (100-120) are ideal for smoothing out the scratches left by coarser grits and preparing the surface for subsequent coats of compound. They strike a balance between material removal and surface refinement.
Higher grits (150-220) are used for final sanding‚ creating a perfectly smooth surface ready for priming and painting. They minimize scratches and ensure optimal paint adhesion. Always progress through grits sequentially – starting coarse and finishing fine – to avoid damaging the drywall.
Consider the drywall’s condition; heavily textured surfaces require coarser grits initially‚ while lightly finished surfaces benefit from medium or fine grits.
Advanced Sanding Techniques
Beyond basic sanding‚ several techniques refine drywall finishing. Feathering edges – gently reducing the sandpaper pressure as you move away from a patch – prevents visible lines. Cross-sanding‚ alternating sanding directions by 90 degrees‚ eliminates unidirectional scratches and ensures even smoothing.
Dustless sanding‚ utilizing a vacuum-attached sander‚ minimizes airborne particles‚ improving air quality and visibility. Contouring involves subtly shaping edges and corners for a softer‚ more professional appearance. Mastering these requires practice.
For textured finishes‚ use specialized sanding sponges or screens to preserve the texture while smoothing imperfections. Avoid over-sanding‚ which can damage the paper face of the drywall. Regularly inspect your work under angled light to identify any remaining imperfections.
Experiment with different grits and techniques to find what works best for your specific project and skill level.